Lallan Terna Magica Home & Kitchen Ideas Mid Century Modern Kitchen Cabinets Iconic Designs That Stand the Test of Time

Mid Century Modern Kitchen Cabinets Iconic Designs That Stand the Test of Time

A kitchen with wood cabinets and shelves Description automatically generated

Mid century modern kitchen cabinets have remained a popular choice for homeowners and designers alike, thanks to their sleek lines, functional design, and timeless appeal. This iconic style, which emerged in the mid-20th century, continues to influence contemporary interiors, offering a perfect blend of simplicity and sophistication. Whether you’re remodeling your kitchen or simply looking for inspiration, mid century modern kitchen cabinets can elevate your space with their classic yet fresh aesthetic.

1. What Defines Mid Century Modern Kitchen Cabinets?

Clean lines, organic shapes, and a focus on functionality characterize mid century modern design. Kitchen cabinets that embrace this style often feature:

  • Minimalist Design: Simple, unadorned cabinetry with flat-panel doors and sleek hardware.

  • Natural Materials: Wood veneers, teak, walnut, and oak are commonly used to bring warmth and texture.

  • Bold Colors: While natural wood tones are prevalent, pops of color such as mustard yellow, turquoise, and avocado green were popular in the era.

  • Geometric Patterns: Subtle patterns and textures add visual interest without overwhelming the space.

  • Streamlined Hardware: Knobs and pulls are often understated, with sleek metallic or wooden finishes.

2. Why Mid Century Modern Kitchen Cabinets Stand the Test of Time

There are several reasons why mid century modern cabinets have maintained their popularity for decades:

Timeless Aesthetic

The simplicity and elegance of mid century modern design ensure that it never looks outdated. The clean lines and uncluttered appearance make it a perfect fit for both traditional and contemporary homes.

Versatile Appeal

Mid century modern cabinets work well with a variety of kitchen styles. Whether paired with retro appliances for a vintage feel or combined with modern finishes for a contemporary twist, they offer incredible versatility.

Functional Design

With a focus on practicality, these cabinets offer ample storage without compromising on style. Features such as open shelving, built-in organizers, and efficient layouts contribute to an organized and stylish kitchen.

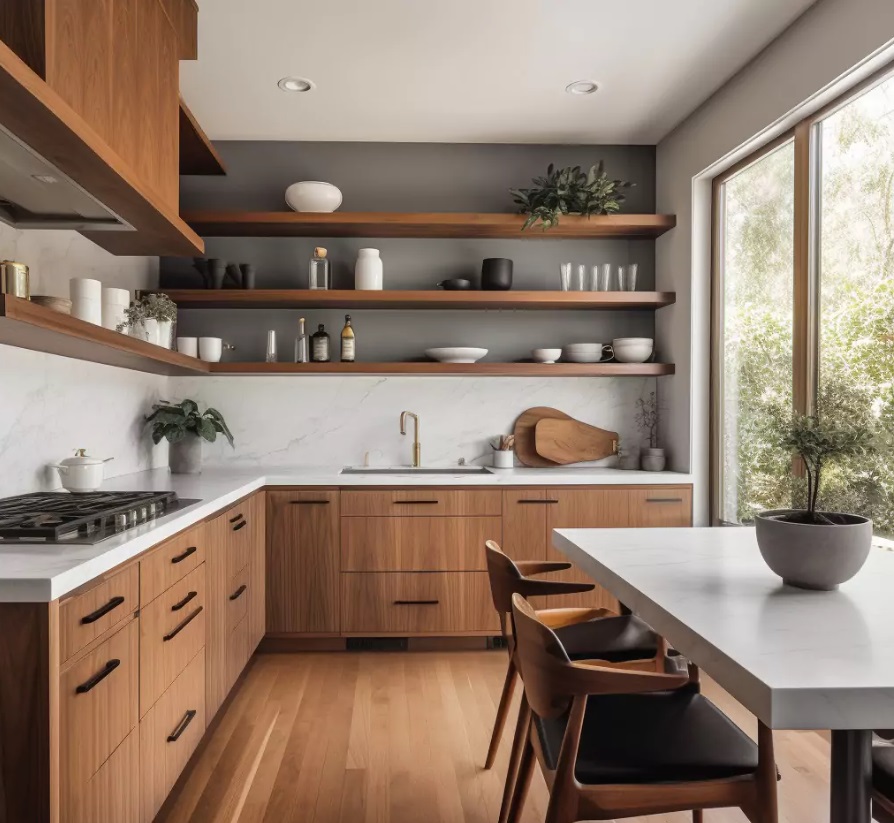
3. Key Design Elements of Mid Century Modern Cabinets

To achieve an authentic mid century modern look in your kitchen, consider incorporating the following design elements:

Flat-Panel Doors

Flat-panel, also known as slab doors, are a hallmark of mid century modern cabinetry. They provide a sleek, streamlined look that enhances the minimalist appeal of the style.

Wood Grain Finishes

Natural wood finishes, such as walnut and oak, add warmth and depth to your kitchen. Opting for wood veneer or laminate with visible grain patterns can capture the authentic feel of the era.

Open Shelving

A signature feature of mid century modern kitchens is open shelving. It allows you to display dishware, cookbooks, and decorative pieces, adding personality and practicality.

Bold Accent Colors

Incorporating vibrant colors like teal, mustard, or burnt orange can help recreate the nostalgic charm of the 1950s and 60s while adding a contemporary touch.

Vintage-Inspired Hardware

Choose simple, streamlined handles and pulls in materials like brushed nickel, brass, or wood to maintain an authentic mid century look.

4. How to Incorporate Mid Century Modern Cabinets into Your Kitchen

Whether you’re undertaking a full renovation or just looking to introduce mid century elements, here are a few ways to incorporate this timeless style into your kitchen:

Pair with Retro Appliances

Complement your cabinets with vintage-style appliances in pastel colors or stainless steel to enhance the mid century vibe.

Add Statement Lighting

Pendant lights with geometric or atomic designs can serve as striking focal points while reinforcing the era’s aesthetic.

Mix Materials

Combine wood cabinetry with quartz or terrazzo countertops to achieve a balanced and cohesive look.

Use Mid Century Decor

Accessorize your kitchen with mid century-inspired decor such as geometric-patterned rugs, minimalist bar stools, and retro artwork.

5. Choosing the Right Materials and Finishes

Selecting the right materials and finishes is crucial to achieving an authentic mid century modern kitchen. Here are some options to consider:

Wood Veneers

Wood veneers offer a cost-effective way to achieve the rich, natural look of solid wood while maintaining durability and sustainability.

Laminate

High-quality laminates in wood grain or vibrant colors are a practical choice that captures the style of mid century kitchens.

Matte Finishes

Opting for matte rather than glossy finishes can help maintain the understated elegance of mid century design.

6. Maintenance Tips for Mid Century Modern Cabinets

To keep your mid century modern cabinets looking pristine, follow these maintenance tips:

  • Regular Cleaning: Wipe down cabinets with a damp cloth and mild detergent to remove dust and grime.

  • Avoid Harsh Chemicals: Steer clear of abrasive cleaners that can damage the finish.

  • Protect from Moisture: Ensure proper ventilation in your kitchen to prevent warping and moisture damage.

  • Polish Wood Surfaces: Use furniture polish periodically to maintain the natural sheen of wood cabinets.

7. Conclusion

Mid century modern kitchen cabinets offer a timeless blend of functionality, elegance, and versatility. Their clean lines, natural materials, and iconic designs make them a perfect choice for homeowners looking to create a stylish yet practical kitchen. Whether you embrace the full retro aesthetic or add subtle mid century touches, these cabinets can elevate your kitchen design and stand the test of time.

Ready to bring mid century charm to your kitchen? Start your design journey today and create a space that embodies both nostalgia and modern sophistication.

Leave a Reply

Your email address will not be published. Required fields are marked *

Related Post

How To Start Organic Gardening At Home?How To Start Organic Gardening At Home?

Imagine stepping into a lush, verdant oasis right in your own backyard, where the air is fragrant with the scent of fresh herbs and ripening vegetables. Starting organic gardening at home isn’t just a hobby—it’s a transformative journey toward self-sufficiency, health, and harmony with nature. The idea of cultivating your own greens can feel daunting at first.

Where do you begin? Which seeds are worth planting? How do you nurture life without relying on chemical shortcuts? These questions ignite curiosity, but also opportunity. By embracing simple yet effective gardening tips, you can turn a modest patch of soil into a thriving ecosystem teeming with vitality.

Organic gardening empowers you to take control of what you consume, reducing toxins and elevating flavor in your everyday meals. The allure isn’t just in the harvest—it’s in the tactile joy of tending to living plants, witnessing tiny seeds blossom into flourishing crops, and knowing that your hands are the instruments of this growth. Ready to dig in? Step forward and unlock the secrets to starting organic gardening at home, transforming ordinary soil into extraordinary sustenance, one seed at a time.

Why Choose Organic Gardening?

Before we dive into the "how," it’s important to understand the "why." Organic gardening is more than just a trend—it’s a movement toward environmental stewardship, healthier living, and sustainable food production.

Health Benefits

Growing your own food organically ensures that your fruits, vegetables, and herbs are free from pesticides, synthetic fertilizers, and harmful chemicals. This translates to cleaner, more nutrient-rich produce that supports better overall health. Studies show that organically grown produce often contains higher levels of antioxidants and essential nutrients compared to conventionally grown crops.

Environmental Impact

Organic gardening reduces your carbon footprint. By avoiding chemical fertilizers and pesticides, you prevent soil and water contamination and support biodiversity. Pollinators such as bees and butterflies thrive in organic gardens, and soil microorganisms flourish, improving long-term soil fertility.

Economic Benefits

While the initial investment in seeds, soil, and tools might seem high, growing your own organic produce can save money in the long run. Fresh vegetables, fruits, and herbs from your garden reduce the need for store-bought produce, especially organic varieties, which are often expensive.

Emotional Satisfaction

Gardening is therapeutic. It reduces stress, enhances mindfulness, and provides a sense of accomplishment. Watching your garden grow and thrive is deeply rewarding, creating a connection with nature and the food you consume.

Step 1: Planning Your Organic Garden

Before planting a single seed, planning is crucial. Thoughtful planning ensures your garden thrives and produces a bountiful harvest.

Choosing the Right Location

Select a location that receives adequate sunlight—ideally 6-8 hours of direct sunlight daily. Good drainage is essential; standing water can cause root rot and attract pests. If you don’t have a backyard, consider container gardening or vertical gardening on your balcony or terrace.

Determining Your Garden Size

Start small if you’re a beginner. A manageable garden allows you to focus on quality and learn as you grow. Consider factors like space, water access, and maintenance time when determining the size of your organic garden.

Deciding What to Grow

Choose plants suited to your climate, soil, and personal preference. Leafy greens, tomatoes, peppers, herbs, and root vegetables are excellent for beginners. Consider seasonal planting to maximize productivity and reduce the risk of crop failure.

Sketch Your Garden Layout

Draw a simple plan of your garden, marking where each plant will go. This helps with spacing, companion planting, and crop rotation planning—key practices in organic gardening.

Step 2: Preparing the Soil

Healthy soil is the foundation of a thriving organic garden. Organic gardening prioritizes natural soil fertility over chemical inputs.

Testing Soil Quality

Conduct a soil test to understand pH levels, nutrient content, and soil type. Most vegetables prefer slightly acidic to neutral soil (pH 6-7). Soil testing kits are inexpensive and available at garden stores or online.

Improving Soil Fertility

Enhance your soil using organic matter like compost, manure, or leaf mold. These materials improve soil structure, increase nutrient content, and promote beneficial microorganisms. Avoid synthetic fertilizers; they can disrupt soil balance over time.

Mulching

Apply organic mulch (straw, wood chips, shredded leaves) around your plants to conserve moisture, suppress weeds, and regulate soil temperature. Mulching is a cornerstone practice in organic gardening, promoting healthy soil and plant growth.

Step 3: Choosing Seeds and Plants

The heart of your organic garden lies in the seeds and plants you select.

Selecting Organic Seeds

Purchase certified organic seeds from reputable suppliers. Organic seeds ensure that your garden remains free from genetically modified organisms (GMOs) and chemicals.

Choosing Disease-Resistant Varieties

Opt for plant varieties resistant to local pests and diseases. Resistant plants reduce the need for intervention and improve your chances of a successful harvest.

Starting Seeds Indoors

For climates with short growing seasons, start seeds indoors in seed trays or small pots. Transplant seedlings outdoors once they are strong enough to withstand local conditions.

Step 4: Planting Your Organic Garden

Planting is both an art and a science. Proper techniques ensure healthy growth and minimize problems down the line.

Timing

Follow local planting calendars to know the best times to sow each crop. Seasonal planting reduces pest pressure and ensures optimal growth.

Spacing

Give plants enough space to grow. Crowded plants compete for light, nutrients, and water, leading to weaker growth and higher susceptibility to pests.

Companion Planting

Plant complementary crops near each other to naturally deter pests, attract pollinators, and improve soil fertility. For example, planting basil near tomatoes can repel harmful insects while enhancing growth.

Step 5: Watering Your Garden

Water management is crucial in organic gardening.

Watering Techniques

Water deeply but infrequently to encourage strong root systems. Avoid overhead watering, which can promote fungal diseases. Drip irrigation or soaker hoses are ideal for conserving water and targeting the root zone directly.

Timing

Water early in the morning to reduce evaporation and fungal growth. Evening watering can lead to prolonged leaf wetness, encouraging diseases.

Rainwater Harvesting

Collect rainwater to reduce reliance on municipal water. Rainwater is chemical-free, making it ideal for your organic garden.

Step 6: Fertilizing Organically

Feeding your plants with natural nutrients is key to organic gardening success.

Compost

Compost provides balanced nutrition and improves soil texture. Regularly add compost to plant beds and containers to maintain soil fertility.

Organic Fertilizers

Use organic fertilizers like bone meal, fish emulsion, seaweed extract, or vermicompost. These fertilizers release nutrients slowly and support long-term soil health.

Cover Crops

Plant cover crops like clover or legumes to naturally enrich soil with nitrogen and prevent erosion. This is a sustainable technique widely used in organic gardening.

Step 7: Pest and Disease Management

Pest and disease management in organic gardening focuses on prevention, biodiversity, and natural solutions.

Natural Predators

Encourage beneficial insects such as ladybugs, lacewings, and predatory beetles to control pests. Birds also play a vital role in keeping insect populations in check.

Homemade Remedies

Use neem oil, garlic spray, or insecticidal soap to manage pests without chemicals. These solutions are safe for humans, pets, and beneficial insects.

Crop Rotation

Rotate crops each season to prevent soil-borne diseases and nutrient depletion. Crop rotation is a time-tested practice in organic gardening.

Step 8: Harvesting and Storage

Harvesting at the right time ensures maximum flavor, nutrition, and productivity.

When to Harvest

Pick vegetables and fruits when they reach peak ripeness. Overripe produce may attract pests and lose quality.

Proper Handling

Handle crops gently to avoid bruising. Wash produce in clean water before storage or consumption.

Storage Tips

Store vegetables in a cool, dry place or refrigerate leafy greens to prolong freshness. Root vegetables like carrots and potatoes can be stored in a dark, ventilated area.

Step 9: Seasonal Maintenance

An organic garden requires consistent care throughout the year.

Pruning

Regularly prune plants to improve air circulation, remove dead or diseased parts, and encourage growth.

Weed Control

Remove weeds manually or with organic mulch. Avoid chemical herbicides, which disrupt soil health.

Soil Care

Continue to enrich soil with compost and organic matter after each harvest to maintain fertility.

Step 10: Advanced Organic Gardening Techniques

Once you’ve mastered the basics, you can explore advanced techniques to maximize yield and sustainability.

Vertical Gardening

Use trellises, shelves, or hanging baskets to grow more plants in limited space. Vertical gardening is ideal for urban homes or small backyards.

Hydroponics and Aquaponics

These soilless methods use water and nutrients to grow plants efficiently. While slightly more advanced, they align with organic gardening principles when done naturally.

Permaculture

Permaculture integrates garden design with natural ecosystems. It focuses on sustainable, self-sufficient gardening practices that conserve energy and resources.

Tips for Beginners

  • Start small and gradually expand your garden.

  • Keep a garden journal to track planting dates, growth, and harvest.

  • Learn from failures—they are part of the process.

  • Connect with local gardening groups for advice and support.

Common Mistakes to Avoid

  1. Overwatering or underwatering plants.

  2. Ignoring soil health and relying solely on fertilizers.

  3. Planting incompatible crops together.

  4. Using chemical pesticides or herbicides in an organic garden.

  5. Neglecting seasonal maintenance and composting.

Avoiding these mistakes will help your organic garden thrive sustainably.

Conclusion

Starting an organic garden at home is more than a hobby; it’s a lifestyle choice that benefits your health, the environment, and your wallet. By following this comprehensive guide—planning carefully, nurturing your soil, choosing the right seeds, watering smartly, and managing pests naturally—you can create a thriving, productive garden that yields fresh, nutritious food all year round.

Remember, organic gardening is a journey, not a one-time project. Each step you take—whether composting kitchen scraps, planting a row of herbs, or encouraging pollinators—contributes to a more sustainable and rewarding life. Start small, stay consistent, and enjoy the countless rewards that come from cultivating your own natural oasis.

Your organic garden awaits. Dig in, nurture it, and watch your home transform into a flourishing paradise of health, sustainability, and beauty.

Water Heater Repair For Rusty Water IssuesWater Heater Repair For Rusty Water Issues

Imagine turning on your tap, expecting a soothing flow of crystal-clear water, only to be greeted by a murky, rusty stream. It’s more than an eyesore—it’s a red flag signaling underlying problems in your plumbing system. Rusty water is not merely a cosmetic issue; it’s an indication that your water heater might be corroded or failing, silently compromising the quality of your daily water supply. Many homeowners in Dubai overlook this warning, allowing minor corrosion to escalate into costly damages.

The solution lies in proactive water heater repair Dubai services that tackle the root cause, not just the symptoms. Skilled technicians can diagnose sediment buildup, rusting tanks, and deteriorating anodes, restoring your water heater to peak efficiency. Imagine hot showers without the unpleasant tinge, cooking with water that’s genuinely safe, and prolonging the lifespan of your appliance—all possible with timely intervention.

Understanding the Causes of Rusty Water

The Role of the Water Heater in Rusty Water

Your Water Heater is more than just a tank of warm water—it’s a complex system that ensures consistent water temperature for your home. Over time, however, internal components can deteriorate, leading to rust.

The tank of a traditional water heater is usually made of steel, lined with a protective layer of glass. When this lining wears down, the steel is exposed to water and oxygen, which triggers corrosion. As rust forms, particles can mix with your water supply, leading to the familiar reddish-brown color.

Aging Pipes and Plumbing Systems

Rusty water isn’t always directly caused by your Water Heater. Old iron pipes in your home can corrode, releasing rust into your water supply. However, if the problem occurs only when you use hot water, the Water Heater is likely the source.

Sediment Build-Up in the Water Heater

Sediment from minerals like calcium and magnesium can accumulate at the bottom of your Water Heater tank over time. This layer of sediment traps moisture against the steel tank, accelerating corrosion. Flushing your tank regularly is critical to prevent this buildup and minimize rust formation.

Diagnosing Rusty Water Issues

Signs That Your Water Heater Needs Repair

Knowing when to act is key to preventing a small issue from becoming a major repair. Common signs include:

  • Reddish-brown water coming from hot water taps

  • Strange metallic taste in hot water

  • Unusual noises from the tank, such as popping or rumbling

  • Reduced efficiency, with water taking longer to heat

Testing Your Water for Rust

A simple test can help determine if rust is coming from your Water Heater:

  1. Run cold water from a faucet and collect a sample.

  2. Run hot water from the same faucet and collect another sample.

  3. Compare the two samples: if only the hot water shows discoloration, your Water Heater is likely the source.

Common Water Heater Problems That Cause Rusty Water

Corroded Tank

The most common cause of rusty water from a Water Heater is a corroded tank. Once corrosion begins, it spreads quickly, and the tank may eventually develop leaks.

Faulty Anode Rod

The anode rod is a sacrificial metal rod inside the Water Heater tank, designed to attract corrosion and protect the tank lining. Over time, the rod deteriorates, reducing its effectiveness. Replacing a worn anode rod can prevent further rust issues.

Sediment and Mineral Accumulation

Sediment not only accelerates corrosion but also reduces heating efficiency. If left untreated, sediment can clog water lines, strain the heating element, and contribute to rusty water.

Step-by-Step Guide to Repairing a Rusty Water Heater

Safety First

Before beginning any Water Heater repair, ensure your safety:

  • Turn off the power supply (electric) or gas line (gas heater).

  • Shut off the water supply to the Water Heater.

  • Allow the tank to cool to prevent burns.

Flushing the Water Heater

Flushing removes sediment and rust particles, often resolving minor discoloration issues.

  1. Attach a garden hose to the drain valve at the bottom of the tank.

  2. Open the drain valve and let water flow out.

  3. Open a hot water faucet in your home to allow air into the tank.

  4. Once the tank is empty, close the valve, remove the hose, and refill the tank.

Replacing the Anode Rod

Replacing the anode rod can prevent future rust problems:

  1. Locate the anode rod on the top of the tank.

  2. Use a socket wrench to remove the old rod.

  3. Insert a new anode rod, tightening securely.

  4. Refill the tank and restore power or gas.

Repairing or Replacing a Corroded Tank

If the tank itself is corroded beyond repair, replacement may be the only solution. Consider:

  • A traditional tank water heater

  • A tankless water heater for long-term efficiency

  • Checking warranty coverage for your current Water Heater

Preventive Measures for Rust-Free Water

Regular Maintenance Tips

  1. Flush your Water Heater every 6–12 months.

  2. Inspect and replace the anode rod every 3–5 years.

  3. Install a water softener if your water is hard.

  4. Schedule professional inspections every few years.

Using a Water Filtration System

Adding a water filtration system can reduce rust and sediment in your water supply, extending the lifespan of your Water Heater.

DIY vs. Professional Repair: When to Call the Experts

While many Water Heater issues can be addressed at home, some situations require professional intervention:

  • Persistent rusty water after flushing and anode rod replacement

  • Leaks in the tank

  • Strange noises or sudden temperature fluctuations

  • Water heater over 10–12 years old

Professional plumbers have the tools and experience to diagnose underlying issues and ensure a long-term solution.

Frequently Asked Questions About Rusty Water and Water Heaters

How can I tell if my Water Heater is the cause of rusty water?

Check if the discoloration occurs only with hot water. If cold water is clear, your Water Heater is likely the source.

How often should I flush my Water Heater?

Flushing every 6–12 months helps remove sediment and prevent rust formation. Homes with hard water may require more frequent flushing.

Can I prevent rust in my Water Heater?

Yes. Replacing the anode rod, flushing the tank regularly, and using a water softener can prevent rust buildup.

Is rusty water dangerous to drink?

Occasional rusty water is generally not harmful but can cause an unpleasant taste and discolor your laundry. Long-term exposure should be avoided, especially for infants and people with weakened immune systems.

Conclusion

Rusty water is more than a cosmetic issue—it’s a warning sign that your Water Heater or plumbing system may be compromised. By understanding the causes, diagnosing the source, and taking proactive repair measures, you can restore clean, safe hot water in your home.

Regular maintenance, including flushing the tank and replacing the anode rod, is essential to prevent rust and extend the lifespan of your Water Heater. In severe cases, professional repair or tank replacement may be necessary. Following these steps ensures not only the longevity of your water heater but also the health and comfort of your household.

Investing time and effort into maintaining your Water Heater is a small price to pay for the peace of mind that comes with safe, clean, and reliable hot water. Don’t wait until rusty water becomes a permanent problem—take action today and protect your home’s water supply.

Efficient Relocation Tips From Edmonton MoversEfficient Relocation Tips From Edmonton Movers


Moving to a new home in Edmonton can be exciting, but it also comes with its fair share of challenges. From packing material weak items to coordinative schedules, a move requires troubled provision and training. Hiring professional person Edmonton movers can make the entire work on simpler, faster, and less nerve-wracking. Here s a nail guide to preparation your move, choosing the right company, and settling into your new home.

Planning Your Move in Edmonton

Before you start packing boxes, it is world-shattering to produce a moving plan. Start by scene a animated date that workings for your schedule. Weekends and the end of the month are often busy for movers, so reservation early ensures availability. Edmonton movers can often supply direction on the best timing for your resettlement, especially if you are moving during peak season.

Budgeting is another crucial part of provision. List all potential costs, including moving truck renting, packing material supplies, and any temporary worker storehouse fees. When working with Edmonton movers, ask for a careful estimate so there are no surprises. This helps you stay union and financially prepared.

Choosing the Right Edmonton Movers

Selecting a TRUE moving keep company is key to a smooth relocation. Look for Edmonton movers with prescribed customer reviews and proven go through. Check if the companion provides insurance policy for your belongings, as this adds an extra level of tribute.

A good Edmonton moving keep company offers various services, including packing material, loading, transportation system, and unloading. Some movers even cater specialisation services for weak or large items, such as pianos or antiques. Discussing your specific needs in advance ensures that the movers can plan fittingly and avoid last-minute complications.

Packing Tips for a Stress-Free Move

Packing is one of the most time-consuming aspects of animated. Edmonton movers often provide packing material services, but even if you do it yourself, there are a few strategies that can make the work easier.

Start by sorting your property and deciding what to keep, donate, or throw out. This reduces the tote up volume of items to move and helps you stay organised. Use hard-line boxes and quality wadding tape to protect your items. Label each box with its contents and the room it belongs to. This simpleton step saves time when unloading at your new home.

For fragile items like glasswork or electronics, use ripple wrap, packing material wallpaper, or soft blankets. Edmonton movers are skilled to handle these items carefully, but proper packing at home ensures additive safety.

Moving Day Preparation

On moving day, staying unionised and calm is requisite. Have a checklist fix and pass clearly with your Edmonton movers. Keep probative documents, keys, and essentials like toiletries or snacks in a split bag for easy get at.

If you have children or pets, make arrangements for their care during the move. This keeps everyone safe and minimizes strain. Edmonton moving company often organize with clients to control a smooth over load work, so be gear up to guide them through your home and answer any questions.

Settling into Your New Edmonton Home

Once your belongings make it, start by unpacking the essentials. Setting up the kitchen, bedroom, and lavatory first allows you to work comfortably while unpacking the leftover items.

Take time to explore your new neck of the woods, turn up market stores, health chec services, and other conveniences. Edmonton movers can also provide advice on the best topical anesthetic resources and services to help you subside speedily.

For larger piece of furniture or complex setups, consider rental the moving team serve in arranging items safely. Proper emplacemen prevents damage and makes your new quad usefulness from day one.

Extra Tips for a Smooth Relocation

Book Edmonton movers in advance to keep off programing conflicts.

Create an inventory of your material possession before the move for insurance purposes.

Keep a bag of requisite items for the first day in your new home.

Consider temporary depot solutions if your new home is not gear up on animated day.

Stay hydrous and take breaks during heavy lifting to keep injuries.

Working with professional Edmonton movers takes the stress out of moving, saves time, and ensures your holding go far safely. By provision with kid gloves, wadding efficiently, and choosing a trustworthy animated company, your relocation can become a smooth and unionized experience.

Moving is more than just transporting boxes; it s the take up of a new . With Edmonton movers by your side, you can focus on on enjoying your new home while leaving the heavily lifting and logistics to the professionals.

Home Extension Process Expanding Your Support Quad With TitleHome Extension Process Expanding Your Support Quad With Title

Introduction

As families grow and lifestyles change, many homeowners find their present space too small or outdated. Instead of moving to a new property, a home extension phone is a hurt and cost-effective way to add more room and raise your home s functionality.Understanding the home extension work on helps assure that your project runs smoothly, corset within budget, and achieves your dream results.

Step 1: Planning and Vision

Every of import home extension starts with a clear plan and vision.Ask yourself what you need an spear carrier chamber, a large kitchen, or maybe a second livelihood area?Once your goals are outlined, consider how the telephone extension will to the present social system. A well-thought-out plan ensures the new space blends seamlessly with the rest of your home.

Creating a elaborated design brief helps your restoration builder understand your modus vivendi, quad requirements, and design preferences.

Step 2: Setting a Realistic Budget

Budgeting is one of the most profound steps in the home extension work on.Your budget should admit twist costs, materials, permits, and plan fees, plus a 10 15 buffer for unexpected expenses.Consulting an tough builder early on helps you get right cost estimates and avoid fiscal surprises later.

Step 3: Designing the Extension

Once your goals and budget are clear, the next stage is design your home extension.Architects or house renovation process designers make elaborate plans screening the layout, social structure, and finishes.This represent focuses on maximising cancel get off, ventilating system, and flow between the old and new spaces. The design should also follow with your local anesthetic edifice codes and vim-efficiency requirements.

Step 4: Getting Approvals and Permits

Before twist begins, you ll need to get the necessary edifice approvals or permits.This is necessity for biology refuge and legal submission. Professional builders like Segal Build wield all support, ensuring that your envision meets local anaesthetic regulations without excess delays.

Step 5: Site Preparation and Construction

With approvals in place, it s time to start construction.The site training phase involves clearing the area, scene foundations, and making biological science changes if required.Builders then start frame walls, installation roofing, and complementary the social system according to your plans. During this stage, plumbing system and physical phenomenon work are also added where needful.

Step 6: Interior and Exterior Finishing

Once the main twist is done, the focalise shifts to finishing touches.This includes plastering, floor, picture, and instalmen Windows, doors, and light. The goal is to play off the new extension s style with the existing home for a cohesive look.Exterior finishes like interlingual rendition, roofing tiles, and landscape gardening complete the project beautifully.

Step 7: Final Inspection and Handover

Before pass completion, a final review ensures all building standards and refuge measures have been met.Your detergent builder will walk you through the new quad, qualification sure every detail meets your expectations.Once approved, you can take up furnishing and enjoying your new, roomy home.

Conclusion

The home telephone extension work transforms your property by adding space, comfort, and value. From provision to finish, each step requires aid to and guidance.With professional subscribe from Segal Build, homeowners can spread out their living quad with confidence, ensuring the new addition looks and feels like a cancel part of the home. Whether you re building up or outwards, a well-executed home extension phone can turn your plan into reality.

IPTV France Why French TV Fans Should Make the SwitchIPTV France Why French TV Fans Should Make the Switch

If you’re a French TV enthusiast, it’s time to explore the benefits of moving to IPTV in France. With a variety of channels at your disposal, including respected networks like TF1 and Canal+, the range of content available is bound to captivate your interest. The clear high-definition streaming quality and the freedom to watch your preferred shows on your own terms are just the beginning. Furthermore, there are contemporary features ready to enhance your TV viewing experience significantly.

Benefits of Iptv france for French TV Fans

If you’re a French TV fan looking for a more versatile and cost-effective way to enjoy your favorite shows, IPTV is the solution you’ve been waiting for. With IPTV, you can access a wide range of French channels, including popular ones like TF1, France 2, and Canal+. However, the benefits of IPTV go beyond just channel selection.

One of the key advantages of IPTV is its convenience. You can watch your favorite French shows anytime, anywhere, as long as you have an internet connection. This flexibility allows you to catch up on missed episodes or watch live TV on the go.

Additionally, IPTV often offers better image quality compared to traditional cable or satellite TV. With high-definition streams and smooth playback, you can enjoy an immersive viewing experience right from your own home.

Moreover, IPTV services usually come with additional features like video on demand, recording capabilities, and interactive TV guides. These features enhance your TV-watching experience and give you more control over what you watch and when you watch it.

Wide Range of Channels Available

With IPTV, you gain access to a wide array of French channels, catering to diverse interests and preferences. Whether you’re a sports enthusiast, a movie buff, a news junkie, or a lover of reality TV, IPTV offers something for everyone.

From popular mainstream channels to niche networks, you can explore a variety of content that suits your tastes.

IPTV services provide access to a plethora of French channels, including TF1, France 2, M6, Canal+, and more. You can enjoy live broadcasts of your favorite shows, sports events, and news programs without missing a beat.

Additionally, IPTV allows you to discover new channels and programs that you may not have access to with traditional cable or satellite TV.

On-Demand Content Access

Gain immediate entry to a vast library of on-demand content with IPTV. Say goodbye to traditional TV schedules and hello to a world where you decide what, when, and where to watch your favorite shows and movies. With IPTV, you have the freedom to choose from a wide array of on-demand content, including popular TV series, blockbuster movies, documentaries, and more.

Whether you prefer binge-watching an entire season in one sitting or catching up on missed episodes at your own pace, IPTV offers the flexibility you need.

Additionally, IPTV services often include features like pause, rewind, and fast-forward, so you can control your viewing experience like never before. No longer will you have to wait for reruns or worry about missing the start of a program.

With on-demand access, you can enjoy your favorite content whenever it suits you best. So why limit yourself to traditional TV when you can access a world of entertainment with IPTV’s on-demand content library?

Crisp HD Quality Viewing

Experience television like never before with IPTV’s clear HD quality viewing. Say goodbye to grainy, pixelated images and hello to crystal-clear visuals that bring every detail to life on your screen. With IPTV, you can immerse yourself in stunning high-definition content that enhances your viewing experience and makes you feel like you’re right in the middle of the action.

Whether you’re watching your favorite French programs, sports events, or movies, IPTV delivers exceptional picture quality that will make you wonder why you didn’t make the switch sooner. Enjoy vibrant colors, sharp images, and smooth motion changes that make every scene captivating and engaging.

No more struggling to see what’s happening on screen or feeling frustrated by poor image quality. IPTV’s HD viewing ensures that you catch every moment with clarity and precision, making your TV-watching experience truly unforgettable.

Convenience and Modernity of IPTV

If you’re tired of dealing with multiple cable boxes, messy cables, and limited channel options, IPTV offers you the convenience and modernity you’ve been searching for. With IPTV, all your favorite channels are just a click away on one streamlined platform. Say goodbye to the hassle of switching between different boxes and cables – IPTV simplifies your viewing experience.

Moreover, IPTV brings modernity to your TV watching habits. Enjoy features like video-on-demand, catch-up TV, and interactive services that enhance your entertainment options. No more waiting for specific showtimes or missing out on your favorite programs – IPTV puts you in control of what you watch and when.

Embrace the convenience of watching TV on your terms with IPTV. Whether you’re at home or on the go, IPTV allows you to access your favorite content anytime, anywhere. Stay ahead of the curve with this modern TV solution that caters to your viewing preferences. Make the switch to IPTV and elevate your TV experience today.

Frequently Asked Questions

Can I Watch IPTV France on Multiple Devices Simultaneously?

Yes, you can watch IPTV France on multiple devices simultaneously. Enjoy streaming your favorite French shows on various screens at the same time for a more convenient viewing experience. Stay entertained wherever you are!

Are There Any Additional Fees for Accessing Premium Channels?

Yes, there aren’t any additional fees for accessing premium channels. You can enjoy them without extra costs. Just make sure to check your subscription details to confirm you have access to all your favorite channels.

Is There a Limit to the Number of Shows I Can Record?

You can record as many shows as you want with IPTV. There’s no limit to the number of shows you can save. Enjoy the flexibility of recording all your favorite programs without worrying about hitting a cap.

Can I Access IPTV France When Traveling Outside the Country?

Yes, you can access IPTV France when traveling outside the country. Enjoy your favorite French TV shows wherever you go. Stay connected and never miss an episode, even when you’re abroad. Experience the convenience of IPTV on the move.

Are There Parental Controls Available on IPTV France Channels?

Yes, parental controls are available on IPTV France channels. You can easily set restrictions to guarantee your kids watch age-appropriate content. Simply navigate to the settings menu and customize the controls to fit your family’s needs.

Conclusion

Make the switch to IPTV in France for a superior TV-watching experience. With a wide range of channels, on-demand content, crisp HD quality, and modern features, French TV fans can enjoy convenience and flexibility like never before. Don’t miss out on the benefits of IPTV – upgrade your viewing experience today!