
Lallan Terna Magica Home & Kitchen Ideas Water Heater Repair For Rusty Water Issues

Water Heater Repair For Rusty Water Issues

Imagine turning on your tap, expecting a soothing flow of crystal-clear water, only to be greeted by a murky, rusty stream. It’s more than an eyesore—it’s a red flag signaling underlying problems in your plumbing system. Rusty water is not merely a cosmetic issue; it’s an indication that your water heater might be corroded or failing, silently compromising the quality of your daily water supply. Many homeowners in Dubai overlook this warning, allowing minor corrosion to escalate into costly damages.

The solution lies in proactive water heater repair Dubai services that tackle the root cause, not just the symptoms. Skilled technicians can diagnose sediment buildup, rusting tanks, and deteriorating anodes, restoring your water heater to peak efficiency. Imagine hot showers without the unpleasant tinge, cooking with water that’s genuinely safe, and prolonging the lifespan of your appliance—all possible with timely intervention.

Understanding the Causes of Rusty Water

The Role of the Water Heater in Rusty Water

Your Water Heater is more than just a tank of warm water—it’s a complex system that ensures consistent water temperature for your home. Over time, however, internal components can deteriorate, leading to rust.

The tank of a traditional water heater is usually made of steel, lined with a protective layer of glass. When this lining wears down, the steel is exposed to water and oxygen, which triggers corrosion. As rust forms, particles can mix with your water supply, leading to the familiar reddish-brown color.

Aging Pipes and Plumbing Systems

Rusty water isn’t always directly caused by your Water Heater. Old iron pipes in your home can corrode, releasing rust into your water supply. However, if the problem occurs only when you use hot water, the Water Heater is likely the source.

Sediment Build-Up in the Water Heater

Sediment from minerals like calcium and magnesium can accumulate at the bottom of your Water Heater tank over time. This layer of sediment traps moisture against the steel tank, accelerating corrosion. Flushing your tank regularly is critical to prevent this buildup and minimize rust formation.

Diagnosing Rusty Water Issues

Signs That Your Water Heater Needs Repair

Knowing when to act is key to preventing a small issue from becoming a major repair. Common signs include:

  • Reddish-brown water coming from hot water taps

  • Strange metallic taste in hot water

  • Unusual noises from the tank, such as popping or rumbling

  • Reduced efficiency, with water taking longer to heat

Testing Your Water for Rust

A simple test can help determine if rust is coming from your Water Heater:

  1. Run cold water from a faucet and collect a sample.

  2. Run hot water from the same faucet and collect another sample.

  3. Compare the two samples: if only the hot water shows discoloration, your Water Heater is likely the source.

Common Water Heater Problems That Cause Rusty Water

Corroded Tank

The most common cause of rusty water from a Water Heater is a corroded tank. Once corrosion begins, it spreads quickly, and the tank may eventually develop leaks.

Faulty Anode Rod

The anode rod is a sacrificial metal rod inside the Water Heater tank, designed to attract corrosion and protect the tank lining. Over time, the rod deteriorates, reducing its effectiveness. Replacing a worn anode rod can prevent further rust issues.

Sediment and Mineral Accumulation

Sediment not only accelerates corrosion but also reduces heating efficiency. If left untreated, sediment can clog water lines, strain the heating element, and contribute to rusty water.

Step-by-Step Guide to Repairing a Rusty Water Heater

Safety First

Before beginning any Water Heater repair, ensure your safety:

  • Turn off the power supply (electric) or gas line (gas heater).

  • Shut off the water supply to the Water Heater.

  • Allow the tank to cool to prevent burns.

Flushing the Water Heater

Flushing removes sediment and rust particles, often resolving minor discoloration issues.

  1. Attach a garden hose to the drain valve at the bottom of the tank.

  2. Open the drain valve and let water flow out.

  3. Open a hot water faucet in your home to allow air into the tank.

  4. Once the tank is empty, close the valve, remove the hose, and refill the tank.

Replacing the Anode Rod

Replacing the anode rod can prevent future rust problems:

  1. Locate the anode rod on the top of the tank.

  2. Use a socket wrench to remove the old rod.

  3. Insert a new anode rod, tightening securely.

  4. Refill the tank and restore power or gas.

Repairing or Replacing a Corroded Tank

If the tank itself is corroded beyond repair, replacement may be the only solution. Consider:

  • A traditional tank water heater

  • A tankless water heater for long-term efficiency

  • Checking warranty coverage for your current Water Heater

Preventive Measures for Rust-Free Water

Regular Maintenance Tips

  1. Flush your Water Heater every 6–12 months.

  2. Inspect and replace the anode rod every 3–5 years.

  3. Install a water softener if your water is hard.

  4. Schedule professional inspections every few years.

Using a Water Filtration System

Adding a water filtration system can reduce rust and sediment in your water supply, extending the lifespan of your Water Heater.

DIY vs. Professional Repair: When to Call the Experts

While many Water Heater issues can be addressed at home, some situations require professional intervention:

  • Persistent rusty water after flushing and anode rod replacement

  • Leaks in the tank

  • Strange noises or sudden temperature fluctuations

  • Water heater over 10–12 years old

Professional plumbers have the tools and experience to diagnose underlying issues and ensure a long-term solution.

Frequently Asked Questions About Rusty Water and Water Heaters

How can I tell if my Water Heater is the cause of rusty water?

Check if the discoloration occurs only with hot water. If cold water is clear, your Water Heater is likely the source.

How often should I flush my Water Heater?

Flushing every 6–12 months helps remove sediment and prevent rust formation. Homes with hard water may require more frequent flushing.

Can I prevent rust in my Water Heater?

Yes. Replacing the anode rod, flushing the tank regularly, and using a water softener can prevent rust buildup.

Is rusty water dangerous to drink?

Occasional rusty water is generally not harmful but can cause an unpleasant taste and discolor your laundry. Long-term exposure should be avoided, especially for infants and people with weakened immune systems.

Conclusion

Rusty water is more than a cosmetic issue—it’s a warning sign that your Water Heater or plumbing system may be compromised. By understanding the causes, diagnosing the source, and taking proactive repair measures, you can restore clean, safe hot water in your home.

Regular maintenance, including flushing the tank and replacing the anode rod, is essential to prevent rust and extend the lifespan of your Water Heater. In severe cases, professional repair or tank replacement may be necessary. Following these steps ensures not only the longevity of your water heater but also the health and comfort of your household.

Investing time and effort into maintaining your Water Heater is a small price to pay for the peace of mind that comes with safe, clean, and reliable hot water. Don’t wait until rusty water becomes a permanent problem—take action today and protect your home’s water supply.

Leave a Reply

Your email address will not be published. Required fields are marked *

Related Post

Outdoor Rubber Mats for Safer EntrancesOutdoor Rubber Mats for Safer Entrances

Ensuring safe, clean, and welcoming entrances is essential for any home, office, or commercial building. Outdoor Rubber Mats play a crucial role in enhancing safety, reducing slip hazards, and maintaining cleanliness in high-traffic areas. This comprehensive guide explores everything you need to know about outdoor rubber mats, their benefits, selection tips, maintenance practices, and how they transform your entryways into safer, more durable spaces.

Why Outdoor Rubber Mats Are Essential

Entrances are the first point of contact for guests, employees, and visitors. Wet floors, dirt accumulation, and slippery surfaces can pose serious risks. By installing rubber floor mats at your entrances, you create a non-slip barrier that effectively traps dirt, moisture, and debris while providing a sturdy grip for footwear. Outdoor rubber mats are designed to withstand heavy foot traffic and harsh weather conditions, making them an ideal choice for long-term safety solutions.

Benefits of Outdoor Rubber Mats

Outdoor Rubber Mats are not just about safety—they add value in multiple ways. Let’s explore the key benefits:

1. Slip-Resistance and Safety

One of the primary reasons for using rubber floor mats is to prevent slips and falls. These mats are engineered with textured surfaces that improve traction, even when wet.

2. Dirt and Moisture Control

Outdoor mats act as the first line of defense against outdoor contaminants. They scrape off mud, dirt, snow, and water, ensuring that your indoor floors stay clean and dry.

3. Weather Resistance

Outdoor Rubber Mats are crafted to endure extreme temperatures, UV rays, and heavy rain without cracking or losing their grip.

4. Easy Maintenance

Unlike traditional carpets, rubber floor mats are easy to clean with a quick rinse or brush, saving time and maintenance costs.

5. Enhanced Aesthetics

Modern outdoor mats come in various styles, patterns, and sizes, adding a touch of elegance while serving a functional purpose.

Types of Outdoor Rubber Mats

There are several categories of Outdoor Rubber Mats designed for different entrance types and needs:

1. Drainage Mats

These mats feature holes or perforations that allow water and debris to pass through, keeping the surface dry and safe.

2. Scraper Mats

Ideal for high-traffic areas, scraper mats aggressively remove dirt and mud from shoes, preventing it from being tracked indoors.

3. Multi-Purpose Mats

These versatile rubber floor mats can be used in both residential and commercial entrances for general safety and cleanliness.

4. Heavy-Duty Industrial Mats

For factories, warehouses, or commercial buildings with heavy equipment movement, these mats provide extra durability and anti-fatigue properties.

Choosing the Right Outdoor Rubber Mats

When selecting Outdoor Rubber Mats, consider the following factors to ensure they meet your specific needs:

1. Size and Coverage

Measure the entrance area carefully. Mats should be large enough to cover the entire entryway, allowing at least two steps for proper shoe cleaning.

2. Material Quality

Opt for mats made from natural or synthetic rubber with high tensile strength to withstand constant use.

3. Non-Slip Backing

Ensure the mat has a secure grip to prevent shifting or curling, which can create trip hazards.

4. Climate Suitability

Choose mats designed to handle the weather conditions in your region, whether it’s heavy rain, snow, or heat.

5. Aesthetic Appeal

Outdoor Rubber Mats should complement the style of your property while serving their functional purpose.

Installation of Outdoor Rubber Mats

Proper installation is key to maximizing the effectiveness of rubber floor mats. Here are steps to follow:

  1. Clean the entrance area thoroughly.
  2. Ensure the surface is dry before placing the mat.
  3. Position the mat securely, leaving no gaps for tripping.
  4. For larger mats, consider anchoring or using adhesive strips.

Maintenance and Care

Maintaining Outdoor Rubber Mats ensures their longevity and performance. Follow these tips:

  • Shake off loose debris regularly.
  • Rinse with a hose or pressure washer when heavily soiled.
  • Use mild soap for stubborn stains.
  • Inspect for cracks or wear every few months and replace if needed.

Cost-Effectiveness of Rubber Floor Mats

Investing in rubber floor mats saves money over time by reducing cleaning costs, preventing floor damage, and minimizing liability risks from slips and falls.

Environmental Benefits

Many Outdoor Rubber Mats are made from recycled rubber, contributing to environmental sustainability. Choosing eco-friendly mats reduces landfill waste and promotes responsible resource use.

Commercial vs Residential Use

While the primary purpose remains safety and cleanliness, the requirements for commercial and residential settings may differ:

For Homes

Choose decorative yet functional rubber floor mats to enhance the look of your porch or patio.

For Businesses

Opt for heavy-duty, high-traction Outdoor Rubber Mats to handle more foot traffic and comply with safety regulations.

Common Mistakes to Avoid

  • Using undersized mats that fail to cover the entrance properly.
  • Ignoring weather compatibility when purchasing.
  • Skipping regular maintenance, leading to early wear.
  • Choosing low-quality rubber that cracks in extreme conditions.

Future Trends in Outdoor Rubber Mats

The industry continues to innovate with smart rubber floor mats featuring antimicrobial coatings, customizable designs, and advanced drainage systems.

Conclusion

Incorporating Outdoor Rubber Mats at your entrances is an essential step toward creating safer, cleaner, and more welcoming spaces. From preventing slips to trapping dirt and improving aesthetics, these mats offer unmatched benefits for both residential and commercial environments. With the right selection, proper installation, and routine maintenance, your rubber floor mats will serve as a reliable safety investment for years to come. Whether you need simple home entry mats or industrial-grade options, outdoor rubber mats stand as the perfect solution for any entrance that values safety and cleanliness.

How To Start Organic Gardening At Home?How To Start Organic Gardening At Home?

Imagine stepping into a lush, verdant oasis right in your own backyard, where the air is fragrant with the scent of fresh herbs and ripening vegetables. Starting organic gardening at home isn’t just a hobby—it’s a transformative journey toward self-sufficiency, health, and harmony with nature. The idea of cultivating your own greens can feel daunting at first.

Where do you begin? Which seeds are worth planting? How do you nurture life without relying on chemical shortcuts? These questions ignite curiosity, but also opportunity. By embracing simple yet effective gardening tips, you can turn a modest patch of soil into a thriving ecosystem teeming with vitality.

Organic gardening empowers you to take control of what you consume, reducing toxins and elevating flavor in your everyday meals. The allure isn’t just in the harvest—it’s in the tactile joy of tending to living plants, witnessing tiny seeds blossom into flourishing crops, and knowing that your hands are the instruments of this growth. Ready to dig in? Step forward and unlock the secrets to starting organic gardening at home, transforming ordinary soil into extraordinary sustenance, one seed at a time.

Why Choose Organic Gardening?

Before we dive into the "how," it’s important to understand the "why." Organic gardening is more than just a trend—it’s a movement toward environmental stewardship, healthier living, and sustainable food production.

Health Benefits

Growing your own food organically ensures that your fruits, vegetables, and herbs are free from pesticides, synthetic fertilizers, and harmful chemicals. This translates to cleaner, more nutrient-rich produce that supports better overall health. Studies show that organically grown produce often contains higher levels of antioxidants and essential nutrients compared to conventionally grown crops.

Environmental Impact

Organic gardening reduces your carbon footprint. By avoiding chemical fertilizers and pesticides, you prevent soil and water contamination and support biodiversity. Pollinators such as bees and butterflies thrive in organic gardens, and soil microorganisms flourish, improving long-term soil fertility.

Economic Benefits

While the initial investment in seeds, soil, and tools might seem high, growing your own organic produce can save money in the long run. Fresh vegetables, fruits, and herbs from your garden reduce the need for store-bought produce, especially organic varieties, which are often expensive.

Emotional Satisfaction

Gardening is therapeutic. It reduces stress, enhances mindfulness, and provides a sense of accomplishment. Watching your garden grow and thrive is deeply rewarding, creating a connection with nature and the food you consume.

Step 1: Planning Your Organic Garden

Before planting a single seed, planning is crucial. Thoughtful planning ensures your garden thrives and produces a bountiful harvest.

Choosing the Right Location

Select a location that receives adequate sunlight—ideally 6-8 hours of direct sunlight daily. Good drainage is essential; standing water can cause root rot and attract pests. If you don’t have a backyard, consider container gardening or vertical gardening on your balcony or terrace.

Determining Your Garden Size

Start small if you’re a beginner. A manageable garden allows you to focus on quality and learn as you grow. Consider factors like space, water access, and maintenance time when determining the size of your organic garden.

Deciding What to Grow

Choose plants suited to your climate, soil, and personal preference. Leafy greens, tomatoes, peppers, herbs, and root vegetables are excellent for beginners. Consider seasonal planting to maximize productivity and reduce the risk of crop failure.

Sketch Your Garden Layout

Draw a simple plan of your garden, marking where each plant will go. This helps with spacing, companion planting, and crop rotation planning—key practices in organic gardening.

Step 2: Preparing the Soil

Healthy soil is the foundation of a thriving organic garden. Organic gardening prioritizes natural soil fertility over chemical inputs.

Testing Soil Quality

Conduct a soil test to understand pH levels, nutrient content, and soil type. Most vegetables prefer slightly acidic to neutral soil (pH 6-7). Soil testing kits are inexpensive and available at garden stores or online.

Improving Soil Fertility

Enhance your soil using organic matter like compost, manure, or leaf mold. These materials improve soil structure, increase nutrient content, and promote beneficial microorganisms. Avoid synthetic fertilizers; they can disrupt soil balance over time.

Mulching

Apply organic mulch (straw, wood chips, shredded leaves) around your plants to conserve moisture, suppress weeds, and regulate soil temperature. Mulching is a cornerstone practice in organic gardening, promoting healthy soil and plant growth.

Step 3: Choosing Seeds and Plants

The heart of your organic garden lies in the seeds and plants you select.

Selecting Organic Seeds

Purchase certified organic seeds from reputable suppliers. Organic seeds ensure that your garden remains free from genetically modified organisms (GMOs) and chemicals.

Choosing Disease-Resistant Varieties

Opt for plant varieties resistant to local pests and diseases. Resistant plants reduce the need for intervention and improve your chances of a successful harvest.

Starting Seeds Indoors

For climates with short growing seasons, start seeds indoors in seed trays or small pots. Transplant seedlings outdoors once they are strong enough to withstand local conditions.

Step 4: Planting Your Organic Garden

Planting is both an art and a science. Proper techniques ensure healthy growth and minimize problems down the line.

Timing

Follow local planting calendars to know the best times to sow each crop. Seasonal planting reduces pest pressure and ensures optimal growth.

Spacing

Give plants enough space to grow. Crowded plants compete for light, nutrients, and water, leading to weaker growth and higher susceptibility to pests.

Companion Planting

Plant complementary crops near each other to naturally deter pests, attract pollinators, and improve soil fertility. For example, planting basil near tomatoes can repel harmful insects while enhancing growth.

Step 5: Watering Your Garden

Water management is crucial in organic gardening.

Watering Techniques

Water deeply but infrequently to encourage strong root systems. Avoid overhead watering, which can promote fungal diseases. Drip irrigation or soaker hoses are ideal for conserving water and targeting the root zone directly.

Timing

Water early in the morning to reduce evaporation and fungal growth. Evening watering can lead to prolonged leaf wetness, encouraging diseases.

Rainwater Harvesting

Collect rainwater to reduce reliance on municipal water. Rainwater is chemical-free, making it ideal for your organic garden.

Step 6: Fertilizing Organically

Feeding your plants with natural nutrients is key to organic gardening success.

Compost

Compost provides balanced nutrition and improves soil texture. Regularly add compost to plant beds and containers to maintain soil fertility.

Organic Fertilizers

Use organic fertilizers like bone meal, fish emulsion, seaweed extract, or vermicompost. These fertilizers release nutrients slowly and support long-term soil health.

Cover Crops

Plant cover crops like clover or legumes to naturally enrich soil with nitrogen and prevent erosion. This is a sustainable technique widely used in organic gardening.

Step 7: Pest and Disease Management

Pest and disease management in organic gardening focuses on prevention, biodiversity, and natural solutions.

Natural Predators

Encourage beneficial insects such as ladybugs, lacewings, and predatory beetles to control pests. Birds also play a vital role in keeping insect populations in check.

Homemade Remedies

Use neem oil, garlic spray, or insecticidal soap to manage pests without chemicals. These solutions are safe for humans, pets, and beneficial insects.

Crop Rotation

Rotate crops each season to prevent soil-borne diseases and nutrient depletion. Crop rotation is a time-tested practice in organic gardening.

Step 8: Harvesting and Storage

Harvesting at the right time ensures maximum flavor, nutrition, and productivity.

When to Harvest

Pick vegetables and fruits when they reach peak ripeness. Overripe produce may attract pests and lose quality.

Proper Handling

Handle crops gently to avoid bruising. Wash produce in clean water before storage or consumption.

Storage Tips

Store vegetables in a cool, dry place or refrigerate leafy greens to prolong freshness. Root vegetables like carrots and potatoes can be stored in a dark, ventilated area.

Step 9: Seasonal Maintenance

An organic garden requires consistent care throughout the year.

Pruning

Regularly prune plants to improve air circulation, remove dead or diseased parts, and encourage growth.

Weed Control

Remove weeds manually or with organic mulch. Avoid chemical herbicides, which disrupt soil health.

Soil Care

Continue to enrich soil with compost and organic matter after each harvest to maintain fertility.

Step 10: Advanced Organic Gardening Techniques

Once you’ve mastered the basics, you can explore advanced techniques to maximize yield and sustainability.

Vertical Gardening

Use trellises, shelves, or hanging baskets to grow more plants in limited space. Vertical gardening is ideal for urban homes or small backyards.

Hydroponics and Aquaponics

These soilless methods use water and nutrients to grow plants efficiently. While slightly more advanced, they align with organic gardening principles when done naturally.

Permaculture

Permaculture integrates garden design with natural ecosystems. It focuses on sustainable, self-sufficient gardening practices that conserve energy and resources.

Tips for Beginners

  • Start small and gradually expand your garden.

  • Keep a garden journal to track planting dates, growth, and harvest.

  • Learn from failures—they are part of the process.

  • Connect with local gardening groups for advice and support.

Common Mistakes to Avoid

  1. Overwatering or underwatering plants.

  2. Ignoring soil health and relying solely on fertilizers.

  3. Planting incompatible crops together.

  4. Using chemical pesticides or herbicides in an organic garden.

  5. Neglecting seasonal maintenance and composting.

Avoiding these mistakes will help your organic garden thrive sustainably.

Conclusion

Starting an organic garden at home is more than a hobby; it’s a lifestyle choice that benefits your health, the environment, and your wallet. By following this comprehensive guide—planning carefully, nurturing your soil, choosing the right seeds, watering smartly, and managing pests naturally—you can create a thriving, productive garden that yields fresh, nutritious food all year round.

Remember, organic gardening is a journey, not a one-time project. Each step you take—whether composting kitchen scraps, planting a row of herbs, or encouraging pollinators—contributes to a more sustainable and rewarding life. Start small, stay consistent, and enjoy the countless rewards that come from cultivating your own natural oasis.

Your organic garden awaits. Dig in, nurture it, and watch your home transform into a flourishing paradise of health, sustainability, and beauty.

20 Handy Pieces Of Advice For Picking A Chinese Cabinet Manufacturer20 Handy Pieces Of Advice For Picking A Chinese Cabinet Manufacturer


Top 10 Tips On How To Assess The Reputation Of A Chinese Furniture Manufacturer
Here's a thorough guide for assessing the reputation and reviews of the reputation and reviews of a Chinese furniture manufacturer such as OPPEIN in particular when looking at customized furniture like cabinets for kitchens, wardrobes and more.
1. Online Research:
Start by conducting a thorough online research to gather information about the reputation of the manufacturer. Find reviews on a variety of platforms, such as social media, trade sites and forums devoted to home and furniture. Note the general sentiment about the company and look out for recurring themes. This will provide you with an excellent idea of the position of the manufacturer in the market.

2. Utilize Review Aggregators:
Review aggregator sites such as copyright Yelp or Google Reviews can help you find reviews consolidated from multiple sources. These platforms offer ratings that you can use to measure the level of satisfaction with your customers. Instead of merely star ratings, you should look for reviews that are detailed. They can provide you with more information about the customers' experience and will help you identify their strengths and weaknesses.

3. Find out about Industry Awards and Recognition:
Do you know if a brand has been recognized by industry or awards? Recognition from reputable organizations can show a good reputation in an industry as well as demonstrate the company's creativity, quality, and customer care. Find out if they've won any awards on their site or in press release.

4. Refer to references from clients who have been with you for a while.
Request references directly from clients who have worked with the company. Former clients could be able to provide firsthand accounts on their experiences. They can also provide details regarding the quality of products and customer service, as well as satisfaction levels. It is essential to inquire whether the manufacturer is reliable manufacturer, and the speed at which they respond to any questions you may have when you place an order.

5. Portfolio of Case Studies and Portfolio
Look at the case studies, portfolios, and other documents provided by the manufacturers. These documents usually highlight successful projects, and highlight their strengths. Portfolios that include a large number of completed projects are a sign of a business that is experienced at meeting the needs of different customers. Assess their expertise by looking at similar projects.

6. Monitor Social Media:
Evaluate the manufacturer's engagement on social media and its presence. A strong social media presence shows a dedication to customer engagement and satisfaction. Find comments, likes and answers to questions on their social media accounts. Communicating regularly with their followers, engaged manufacturers are more responsive and trustworthy.

7. Investigate Customer Service Practices:
You can ask questions about the customer support of the manufacturer. Watch how they respond to you. A company that has a track record for providing easy, useful information shows that they're committed to their customers.

8. Look for Consistency when reading Reviews
When you collect reviews, seek out consistency. If multiple reviews share similar negative and positive characteristics it is a reliable representation of the company's capabilities. Consistent feedback will help you to identify the strengths and weaknesses of a company.

9. Research Complaints, Resolutions and Redress:
Find out if there are complaints filed against the company, specifically on consumer protection forums or websites. Watch how the company responds to complaints and determine whether it is able to solve issues. A company with a positive reputation will respond to concerns and seek to fix them.

10. Evaluate the length of time and experience:
Then, evaluate the company's longevity in the field. A company that has a long history in the business is more likely to have built up a solid name in the course of time. Information on the manufacturer's experience, history and growth can assist you in determining their reliability and stability.

To conclude, evaluating a Chinese Furniture manufacturer like OPPEIN is a meticulous approach. This involves online research as well client references, industry recognition, and other elements. With these tips will give you more picture of the brand's status on the market, and ensure that you make the right choice regarding your furniture requirements. Read the best door brand for website recommendations including kitchen cabinet store, armoire and wardrobe, cabinet set, two tone kitchen cupboards, kinds of kitchen cabinets, wardrobe custom, solid wood kitchen cabinets, cabinet ideas, cabinet shaker style, modern kitchen units and more.

Top 10 Tips To Evaluate The Competitiveness Of Chinese Furniture Manufacturers
This article will help you determine the quality of the competitiveness of a Chinese manufacturer, such as OPPEIN. It is particularly useful for custom furniture, like kitchen cabinets, wardrobes, and many other things.
1. Conduct market research
Conduct thorough market research in order to get a better understanding of the prices for comparable furniture. Investigate various domestic and international companies that are in the same class to find out the typical prices. It is then possible to compare prices to see if they are comparable.

2. Request for Detailed Quotes
Get detailed quotations from the company that makes the specific product you're interested in. Ensure these quotes include the breakdown of costs for materials such as labor, customizations as well as shipping and associated costs. A clear quote will allow you to compare the pricing of the company with that of competitors.

3. Examining the Quality of Products and Pricing
By comparing the costs of various furniture makers, you will be able to find out the quality and price. Prices can sometimes indicate inferior quality, whereas high costs can be justified by quality materials or craftsmanship. Visit showrooms or request samples to see the quality in person to determine whether the price is in line with the quality offered.

4. Analysis of additional costs
Don't forget to add any other costs that come with the furniture. This may include shipping fees as well as customs duties as well as installation costs, as well as the after-sales costs. Understanding the total costs of ownership will provide you with an idea of just how competitive the company is.

5. Compare Customization Costs
If you need furniture that is custom-designed, inquire about the costs associated with the customization. Custom designs can cost significantly higher from certain companies, while some offer cheaper prices. Comparing costs can help determine which one offers the greatest value for your particular needs.

6. Check for Discounts & Promotions
If you are able to, ask the manufacturer about any specials, promotions, or loyalty programs. These can help lower the overall cost. Manufacturers often have special offers or seasonal sales to increase their price competitiveness. These opportunities can result in substantial savings.

7. Pay Terms:
Examine the payment terms provided by the company that manufactures. Flexible payment options will make huge differences to the total cost. If companies offer financing options or permit the use of staggered billing, they can provide prices that are more competitive, especially when orders of a large size are involved. Understanding these terms can assist you in planning your budget.

8. Make sure you read the Price Matching Policy:
Ask the manufacturer about their policy on price matching. Some manufacturers match or beat prices from other companies on similar products. This is a great way to guarantee you get the best price possible, without sacrificing quality. Understanding the policy can give an advantage when you negotiate.

9. Evaluate the Long-term Value
As you evaluate the furniture, be aware of the potential for long-term use. Take into consideration factors like durability, warranties, and the possibility of maintenance costs. A higher initial cost could be justifiable if furniture is more durable and requires less care over time, resulting in more value over the long term.

10. Get feedback from buyers who have purchased before you.
Last, you can solicit feedback from fellow buyers or industry professionals regarding the competitiveness of the manufacturer. Online forums, reviews sites as well as social networks will provide insights from people who have worked with the business. You can use their perspectives to make better informed choices regarding the cost and value of the product.

Conclusion Assessing the price competitiveness of a Chinese furniture producer like OPPEIN requires a comprehensive assessment that involves thorough research of the market, precise quotations as well as a thorough evaluation of any additional costs, and taking into account long-term value. By following these detailed tips, you can ensure that you are making an informed decision, leading to a successful investment in your furniture plans. Read the best bathroom vanity manufacturers for website advice including kitchen cupboard price, stainless kitchen cabinet, kitchen kitchens, shaker kitchen cupboards, furniture closet, wardrobe closet drawers, kinds of kitchen cabinets, design for cabinet for kitchen, cabinet style doors, closet cabinet and more.

Crafting Spaces With Considerate Hinge SelectionCrafting Spaces With Considerate Hinge Selection

The little details usually make the most considerable distinction when it comes to home design and renovation. Hinges an usually forgotten component play a necessary function in the functionality and visual appeal of cabinets and doors. Cabinet hinges, door hinges, self-closing door hinges, and their variations may appear mundane, but their influence on both use and design is extensive. Recognizing the different kinds and their applications helps house owners make informed decisions that blend design with practicality.

Cabinet hinges are crucial, as they make certain the liquid activity of cabinet doors, whether in kitchen areas, bathrooms, or living spaces. These hinges are available in various styles and finishes, enabling seamless combination with various interior design styles. From antique brass surfaces appropriate for traditional kitchen areas to streamlined, stainless steel alternatives that complement modern-day insides, the breadth of selections makes certain that performance does not come with the expenditure of style. Take into consideration the refined sophistication of hidden cabinet door hinges. These are designed to be hidden when the door is closed, highlighting a tidy, uninterrupted line that is aesthetically enticing. The consolidation of such hinges can change the normal feel of kitchen cabinetry into an extra superior, custom arrangement.

Continuing the theme of refinement, self-closing hinges elevate the energy of both cabinet and standard door setups. These hinges are crafted to bring doors to a mild close immediately, which is not just a luxury function but likewise a sensible one. They reduce the noise related to knocking doors, shielding both the door’s finish and the kitchen cabinetry structure. For family members with kids, self-closing door hinges can stop fingers from being captured in quickly moving doors. The charm of these hinges is that they discreetly improve daily life without attracting attention to themselves. They are a testimony to just how understated design aspects can contribute greatly to a family’s total serenity and order.

Selecting the ideal door hinge entails comprehending the door’s weight and function. Sturdy hinges are necessary for substantial wooden doors, usually found in entranceways or large kitchens, while lighter doors, like those on room wardrobes, can make do with basic hinges.

Self-closing door hinges are a significant subset within this group and have a particular set of applications that extend past property settings into commercial and public spaces. Their development hinges on their capacity to guarantee doors are always closed after flow, which is vital for maintaining power efficiency with lowered warmth loss or cooling retreat. Extra seriously, they fulfill important safety requirements, specifically in fire safety and security techniques, where closed doors can restrain the spread of fires and smoke.

Comparatively, while cabinet door hinges could appear less complex than their normal door equivalents, the array of sophisticated services available changes our interaction with furniture. Soft-close hinges are another technology constructed on the principle of self-closing mechanisms, even more enhancing capability by ensuring that doors or drawers close calmly and gradually.

Whether selecting luxuriant, subjected hinges for a rustic, classic effect or deciding for minimal, hidden alternatives in smooth contemporary atmospheres, hinges offer even more than simply utilitarian value. Designers, property owners, and building contractors often experiment with contrasting coatings to develop factors of passion in a space using glossy chrome hinges on dark timber paneling for a dramatic effect or brass in pale, pastel-themed kitchen area cabinets to add heat and depth.

When it comes to cabinet hinges, these small mechanical devices play an essential duty in making certain that cabinet doors open and close efficiently while staying securely attached to the cabinet framework. The technology doesn’t quit there, as the market continually progresses, resulting in styles such as self-closing door hinges, which make life much more practical by automatically making sure that doors close snugly after being opened up.

The door hinge itself has actually been a cornerstone of building design for centuries, acting as the crucial point that enables the opening and closing of doors a seemingly simple job that significantly improves the functionality of any type of living or functioning space. Door hinges come in a variety of types and designs, each customized to fit specific requirements whether it be the light-weight, thin hinges needed for an interior door or the heavy-duty, weather-resistant varieties required for external doors. With a selection of materials ranging from stainless steel to brass, hinges can be both decorative and functional, mixing seamlessly right into the design of the door or attracting attention as statement items.

As a specialized type of hinge, cabinet door hinges are developed not simply to link a door to a framework, yet to enhance the use and durability of both the door and the cabinet. Hidden hinges use a sleek profile by hiding the hinge device totally within the cabinet itself, providing a structured appearance in modern-day kitchen area designs.

Self-closing hinges stand for a substantial development in hinge modern technology, providing to the significantly active way of lives of people today. For households with young kids or also in specialist settings, self-closing hinges make sure that doors remain shut, thus boosting security by eliminating possible threats such as ignored cabinets or open cabinet doors.

Whether applied to doors or cabinets, hinges remain an important element of any type of structure, integrating utility with layout. Self-closing door hinges capture the significance of this mix, offering both sophistication and practicality. These hinges not just assist in the quiet, automated closing of doors but also supply an aspect of style, adding a modern touch to any type of space. Their usage prevails, from residential settings, where they aid preserve the cleanliness and order of a household home, to industrial facilities, where they add to the performance and security of operations.

The design and selection of door hinges is not a decision to be ignored, as it affects both the functionality and visual of cabinets and doors alike. Various door hinges are specifically created for varied applications, guaranteeing ideal performance in various circumstances. For example, durable hinges are perfect for exterior doors that face the brunt of the components and need robust assistance, whereas lighter hinges could be perfect for indoor doors where visual factors to consider may take precedence over capability.

Selecting the ideal hinge, whether it be a cabinet door hinge, self-closing hinge, or one more range, calls for cautious consideration of a number of factors, consisting of the material of the door, the weight it have to support, and the wanted visual outcome. Today’s option of hinges mirrors continuous technical improvements, with ingenious designs that enhance both convenience of use and longevity.

Discover door hinges the vital function hinges play in home layout and performance, from cabinet to self-closing door hinges, and just how their thoughtful choice can blend design with functionality to boost your home.

Hinges particularly cabinet hinges, self-closing door hinges, door hinges, cabinet door hinges, and self-closing hinges are not just useful elements of building however are integral to the design, safety and security, and benefit of contemporary living rooms. Whether restoring a kitchen area or furnishing a commercial space, understanding the nuances of hinge option and application can make the difference in between simply creating a room and crafting an environment that caters to the nuanced needs of its occupants.

From making certain smooth, reliable movement to improving the aesthetic appeals of homes and commercial spaces, the versatile applications of cabinet hinges, door hinges, and self-closing systems enhance our daily communications with the constructed environment. Following time you open up a cabinet or shut a door, take a moment to appreciate the amazing design and style factor to consider that hinge stands for. Whether in the kind of a cabinet door hinge expertly blending right into woodwork or a robust self-closing door hinge dutifully performing its silent task, each plays an irreplaceable part in the orchestration of our day-to-day activities.

Mid Century Modern Kitchen Cabinets Iconic Designs That Stand the Test of TimeMid Century Modern Kitchen Cabinets Iconic Designs That Stand the Test of Time

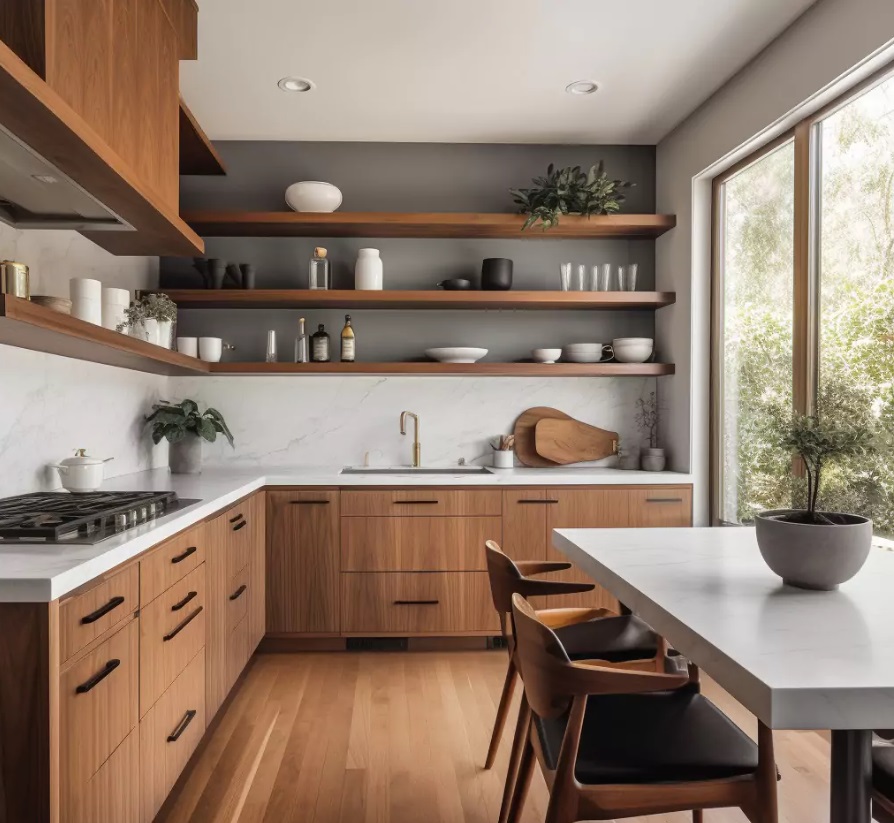
A kitchen with wood cabinets and shelves Description automatically generated

Mid century modern kitchen cabinets have remained a popular choice for homeowners and designers alike, thanks to their sleek lines, functional design, and timeless appeal. This iconic style, which emerged in the mid-20th century, continues to influence contemporary interiors, offering a perfect blend of simplicity and sophistication. Whether you’re remodeling your kitchen or simply looking for inspiration, mid century modern kitchen cabinets can elevate your space with their classic yet fresh aesthetic.

1. What Defines Mid Century Modern Kitchen Cabinets?

Clean lines, organic shapes, and a focus on functionality characterize mid century modern design. Kitchen cabinets that embrace this style often feature:

  • Minimalist Design: Simple, unadorned cabinetry with flat-panel doors and sleek hardware.

  • Natural Materials: Wood veneers, teak, walnut, and oak are commonly used to bring warmth and texture.

  • Bold Colors: While natural wood tones are prevalent, pops of color such as mustard yellow, turquoise, and avocado green were popular in the era.

  • Geometric Patterns: Subtle patterns and textures add visual interest without overwhelming the space.

  • Streamlined Hardware: Knobs and pulls are often understated, with sleek metallic or wooden finishes.

2. Why Mid Century Modern Kitchen Cabinets Stand the Test of Time

There are several reasons why mid century modern cabinets have maintained their popularity for decades:

Timeless Aesthetic

The simplicity and elegance of mid century modern design ensure that it never looks outdated. The clean lines and uncluttered appearance make it a perfect fit for both traditional and contemporary homes.

Versatile Appeal

Mid century modern cabinets work well with a variety of kitchen styles. Whether paired with retro appliances for a vintage feel or combined with modern finishes for a contemporary twist, they offer incredible versatility.

Functional Design

With a focus on practicality, these cabinets offer ample storage without compromising on style. Features such as open shelving, built-in organizers, and efficient layouts contribute to an organized and stylish kitchen.

3. Key Design Elements of Mid Century Modern Cabinets

To achieve an authentic mid century modern look in your kitchen, consider incorporating the following design elements:

Flat-Panel Doors

Flat-panel, also known as slab doors, are a hallmark of mid century modern cabinetry. They provide a sleek, streamlined look that enhances the minimalist appeal of the style.

Wood Grain Finishes

Natural wood finishes, such as walnut and oak, add warmth and depth to your kitchen. Opting for wood veneer or laminate with visible grain patterns can capture the authentic feel of the era.

Open Shelving

A signature feature of mid century modern kitchens is open shelving. It allows you to display dishware, cookbooks, and decorative pieces, adding personality and practicality.

Bold Accent Colors

Incorporating vibrant colors like teal, mustard, or burnt orange can help recreate the nostalgic charm of the 1950s and 60s while adding a contemporary touch.

Vintage-Inspired Hardware

Choose simple, streamlined handles and pulls in materials like brushed nickel, brass, or wood to maintain an authentic mid century look.

4. How to Incorporate Mid Century Modern Cabinets into Your Kitchen

Whether you’re undertaking a full renovation or just looking to introduce mid century elements, here are a few ways to incorporate this timeless style into your kitchen:

Pair with Retro Appliances

Complement your cabinets with vintage-style appliances in pastel colors or stainless steel to enhance the mid century vibe.

Add Statement Lighting

Pendant lights with geometric or atomic designs can serve as striking focal points while reinforcing the era’s aesthetic.

Mix Materials

Combine wood cabinetry with quartz or terrazzo countertops to achieve a balanced and cohesive look.

Use Mid Century Decor

Accessorize your kitchen with mid century-inspired decor such as geometric-patterned rugs, minimalist bar stools, and retro artwork.

5. Choosing the Right Materials and Finishes

Selecting the right materials and finishes is crucial to achieving an authentic mid century modern kitchen. Here are some options to consider:

Wood Veneers

Wood veneers offer a cost-effective way to achieve the rich, natural look of solid wood while maintaining durability and sustainability.

Laminate

High-quality laminates in wood grain or vibrant colors are a practical choice that captures the style of mid century kitchens.

Matte Finishes

Opting for matte rather than glossy finishes can help maintain the understated elegance of mid century design.

6. Maintenance Tips for Mid Century Modern Cabinets

To keep your mid century modern cabinets looking pristine, follow these maintenance tips:

  • Regular Cleaning: Wipe down cabinets with a damp cloth and mild detergent to remove dust and grime.

  • Avoid Harsh Chemicals: Steer clear of abrasive cleaners that can damage the finish.

  • Protect from Moisture: Ensure proper ventilation in your kitchen to prevent warping and moisture damage.

  • Polish Wood Surfaces: Use furniture polish periodically to maintain the natural sheen of wood cabinets.

7. Conclusion

Mid century modern kitchen cabinets offer a timeless blend of functionality, elegance, and versatility. Their clean lines, natural materials, and iconic designs make them a perfect choice for homeowners looking to create a stylish yet practical kitchen. Whether you embrace the full retro aesthetic or add subtle mid century touches, these cabinets can elevate your kitchen design and stand the test of time.

Ready to bring mid century charm to your kitchen? Start your design journey today and create a space that embodies both nostalgia and modern sophistication.